Under-Floor Cable Tray Installation: 4 Things You Need To Know
It’s important to know more about the installation process for your cable trays. Read on to find out why you need a professional for this job, how long it will take, and more so that you can get it done right the first time!
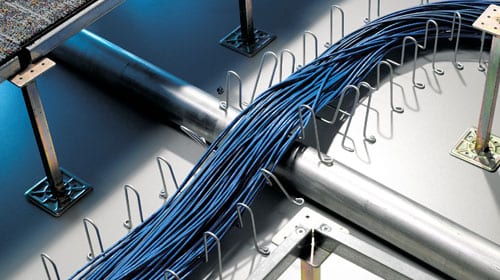
What is Under-Floor Cable Tray Installation?
Under-floor cable tray installation is the process of installing cables and wires beneath the floorboards of a building or home. This type of installation is often used in commercial or industrial settings, where it is necessary to keep cables and wires away from people and other objects.
Under-floor cable tray installation can be a difficult task, depending on the layout of the building or home. In some cases, it may be necessary to remove existing floorboards in order to install the cable tray. Additionally, it is important to ensure that the cable tray is properly installed so that it does not interfere with any existing flooring or furniture.
If you are planning on installing an under-floor cable tray, be sure to consult with a qualified professional. They will be able to help you navigate the installation process and ensure that your requirements are met.
4 Steps to Installing a Cable Tray
If you’re looking to install a cable tray beneath your flooring, there are a few things you need to know. In this article, we’ll walk you through the four steps needed to install a cable tray.
- Choose the Right Tray
The first step is to choose the right cable tray for your needs. There are a variety of different types of cable trays available on the market, so make sure you select the one that best fits your needs. - Prep Your Flooring
Once you have chosen the tray, it’s time to prepare your flooring. Make sure all of the cables and wires are hidden away and that there is enough space below your flooring for the tray. - Install The Tray
Once your flooring is prepared, it’s time to install the tray. Start by inserting the supports into the floor joists and then attach the channels in the tray to those supports. Make sure everything is tight and secure before moving on to Step 4. - Connect The Cables
Now that the installation is complete, it’s time to connect all of the cables and wires in accordance with your specific needs. Make sure everything is connected correctly and
Materials You Will Need for Under-Floor Cable Tray Installation
To install a cable tray under your floor, you will need the following materials:
a. A cable tray
b. Cable ties
c. A drill
d. A screwdriver
e. A level
f. A hammer
g. A saw
h. An adhesive
Before beginning the installation, make sure to follow these instructions:
a. Check the fit of the cable tray and make any necessary adjustments
b. Secure the cable ties around the edges of the tray
c. Drill a pilot hole into the floor for the screwdriver
d. Apply adhesive to the back of the cable tray and attach it to the floor joists
Alternative Solutions for Installing a Cable Tray
If you’re looking to install a cable tray under your floor, there are a few different solutions available. One option is to use an alternative installation method.
If you’re willing to invest in a bit of equipment, you can install a cable tray using a metal frame. This frame is designed to support the weight of the cables and prevents them from contacting the floor. You’ll need to purchase the frame separately, and it will cost around $100.
Alternatively, you can use a cable tray system that’s already built into your floor. This system is more affordable, but it may not be ideal for all situations. If your floor is very porous, the system may not be able to hold up against wear and tear. Additionally, this type of system typically requires professional installation.
0 comments
Write a comment